A couple of years ago now, I ordered three of these hot air balloon puzzles from these Rolife/Robotime guys at the same time as I ordered some larger puzzle/model/kits.
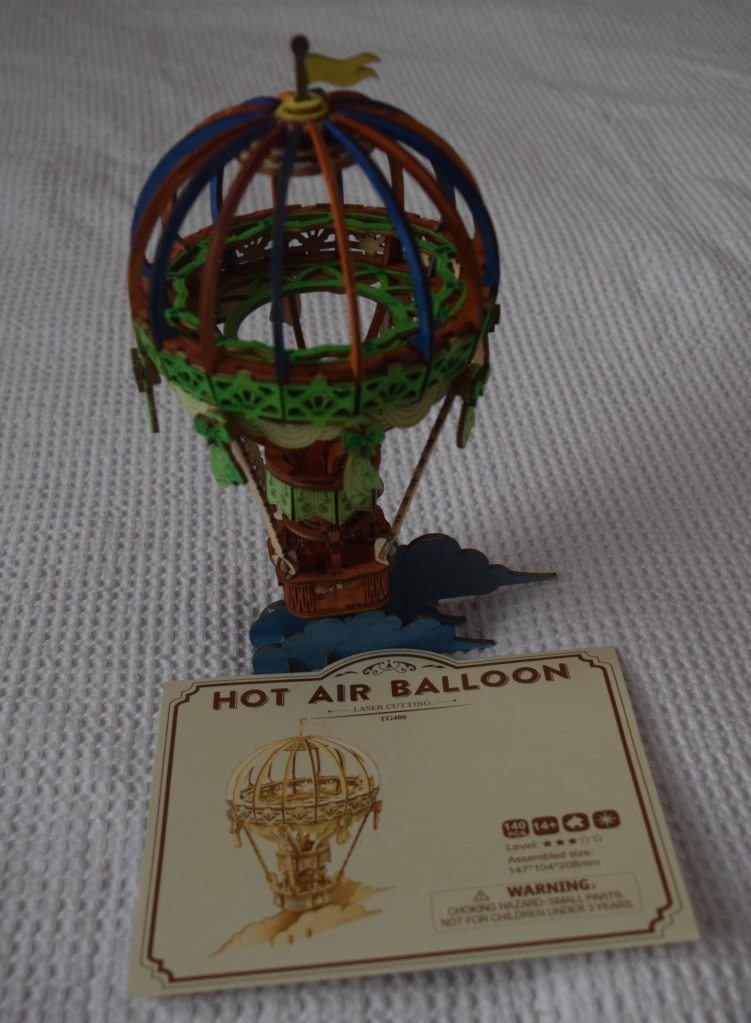
This is the second “hot air balloon” I’ve assembled, and it’s the first time I’ve painted any of the laser-cut puzzles. I was sort-of-joke-gifted a set of paints from the dollar store awhile ago, and I used those paints for this.
I will probably make some different colour choices when I do this again, but I was pleased by how quickly the paint dried, often allowing me to start using the piece I’d painted within an hour or so of painting them and putting them to sit drying under my retro-bulbed desk lamp.
I would say dollar store paints are good enough for an application such as this.
My original plan was to make all three balloons and hang them from my over-window bookshelves in a little balloon bubble (flight?), or alongside other aircraft yet to be acquired or assembled. However, the first balloon I put together was destroyed shortly afterwards, when it was accidentally knocked off a table. Several pieces broke during the balloon’s uncontrolled landing, and it was unfortunately not salvageable.
During assembly of both the first balloon and this second balloon, the “ribs” of the balloon proved quite fragile, particularly as they need to be bent to fit into both a top and a bottom piece. This time around I had two break down towards the bottom as I tried to get them to fit into their slots.
The kit does come with a spare rib.
I do wonder if this is due in part to my having stored this puzzle for several years now in a semi-arid environment, drying the balsa out perhaps further than imagined by the manufacturer, but this time around I also had the tops of the “sand bags” which should attach to the “basket” snap off when I attempted to sand them a little so they’d fit into their positions. (You need to lightly sand many of the pieces after separating them from the balsa sheets, or else their square-or-rectangular prong-bits won’t fit into the sometimes-somewhat-rounded holes they need to fit.)
Over all, I find this kit to be both pretty easy – at no point was I confused about what I should be doing to get the pieces together – and also difficult and a bit frustrating, due to it’s fragility.
I used some school glue to hold a few of the parts together – many of the pieces I painted green, most of which are decorative rather than structural, were falling off with some regularity during continued assembly before I brought out the glue.
I am no longer sure trying to suspend this balloon is a good idea, given the fragility of the ribs. I fear a good gust of wind might cause a crash.
I’m also not sure I want this colour combination suspended from my bookshelf – but that was entirely on me. Why did I pick brown for some of those ribs?! I don’t know what I was thinking.
I may assemble the third and last balloon this spring, while the memory of what went well and what did not go well with this second one is still fresh in my mind.
Or it may wait now until the dog days of summer, when it gets too hot to do anything much.
I likely won’t be ordering a replacement balloon for the first that was lost direct from the company. Shipping charges (and free shipping minimums) are outrageous these days – but I will keep an eye out for more of these “in the wild” – I’ve seen a few similar kits at the sort-of-nearby Winners/ TJ Maxx – and keep getting tempted. And there is also eBay.
This puzzle is officially rated as taking an hour and a half to assemble.
I would say allow for 2.5 to 3 hours, more if you’re painting.
Discover more from Kilmeny MacMichael
Subscribe to get the latest posts sent to your email.
